Properties control how Clips look and behave. Most clips have basic properties (position, rotation, scale, opacity) and type-specific ones (text fonts, video controls, effect parameters). You can adjust these directly or animate them with keyframes.

What Are Properties?
Clips in Banger.Show have a set of editable properties. These properties control things like:
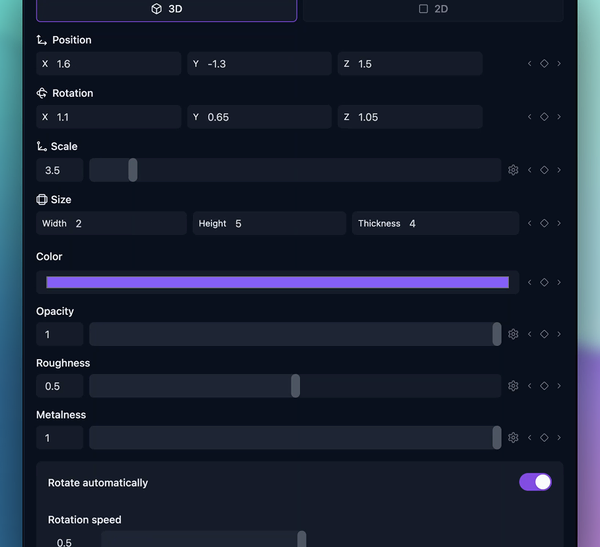
- Position: Where the element appears in 3D space
- Scale: The size of the element along X, Y, and Z axes
- Rotation: The orientation of the element in space
- Opacity: The transparency of the clip (0 = fully transparent, 1 = fully visible)
- Color: The base color or tint of certain elements like text or boxes
- Intensity: For lights and some visual elements
Each Clip type has its own specific set of properties. For example:
- Text clips include font size, outline, and alignment.
- Camera clips include position, rotation, and animations.
- Shader may expose shader-specific controls like speed, hue, or distortion.
Editing Properties
You can edit properties from the Inspector panel (the right panel) when a clip is selected:
- Click a Clip in your Scene on the Timeline.
- The Inspector will show all available properties for that clip.
- Modify the values using sliders, input fields, or color pickers depending on the property type.
- Changes are immediately reflected in the Scene preview.
Animation with Keyframes
For a full keyframe workflow (including easing and curve editing), see the dedicated Keyframes guide.
Keyframes are the cornerstone of animation in Banger.Show. They are markers you set on a Clip's properties at specific points in time to create smooth transitions and dynamic effects.
What keyframes enable?
- Movement: Title sliding in from the side - Fades: Images gradually appearing or disappearing - Transformations: Objects rotating or scaling over time - Dynamic Effects: Camera zooms, color changes, and more
Working with Keyframes
Creating Keyframes
- Navigate to the desired time on the timeline
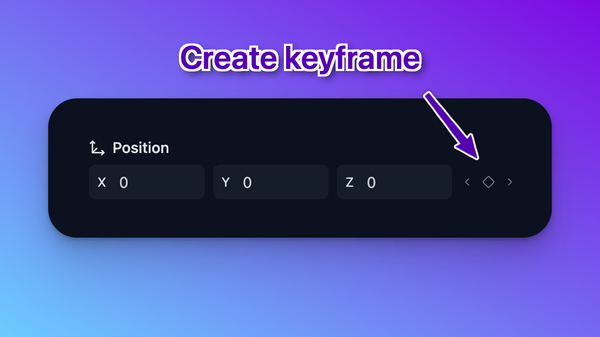
- Click the keyframe button (diamond icon) next to the property you want to animate
- Adjust the property value in the Inspector
- Move to a different time and adjust the property again - a new keyframe is automatically created

Selecting Keyframes
- Single: Click on a keyframe in the timeline
- Multiple: Hold Shift + click additional keyframes
Copy & Paste Keyframes
- Copy: Ctrl+C (Windows) or Cmd+C (Mac) with keyframes selected
- Paste: Move playhead to target time + Ctrl+V (Windows) or Cmd+V (Mac)
- Benefit: Quickly replicate complex animations and maintain timing patterns
Pro Animation Tips
- Copy keyframes to quickly replicate complex animations across different time points - Use consistent timing patterns by copying keyframes to create visual rhythm - Property values are preserved when pasting, making it easy to maintain visual consistency
Audio Reactivity
Audio Reactivity allows your properties to respond to sound, creating dynamic animations synced to your music. By linking a Property (like scale, position, intensity, or opacity) to specific audio frequency ranges, you can achieve effects that move, pulse, or transform based on the beat.

Enabling Audio Reactivity
To activate on a property:
- Select a Clip in your Scene on the Timeline.
- Click on a gear icon near the property you want to react to (if applicable).
- Toggle the Audio Reactivity switch ON.
- Adjust the settings to control how the property responds to audio.
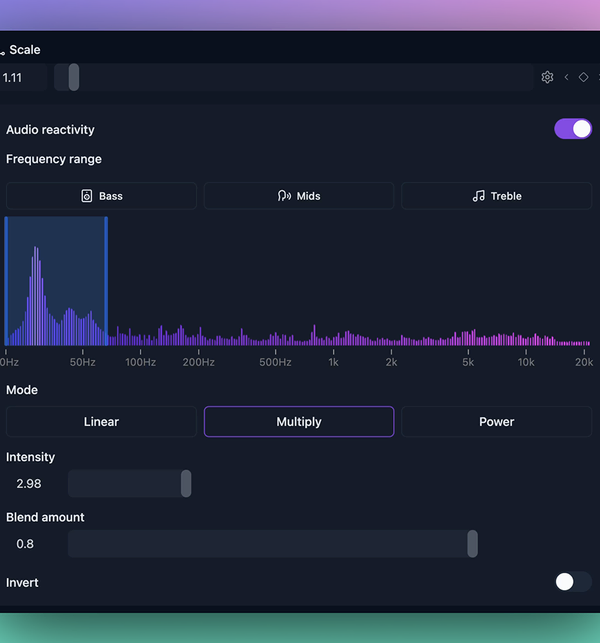
Frequency Range
Choose which part of the audio spectrum should drive the effect:
- Bass: 20–250 Hz (kick drums, bass lines)
- Mids: 250 Hz–4 kHz (vocals, snare, instruments)
- Treble: 4 kHz–20 kHz (hi-hats, synths, sparkle)
You can also manually select a custom frequency band by adjusting the handles on the frequency graph.
Visualization
The graph displays real-time frequency data from the current audio track.
- Vertical bars represent energy levels per frequency bin.
- The highlighted range shows the selected band currently driving the effect.
Modes
Audio data can be mapped to visual properties in different ways using reactivity modes:
- Linear (default): Appends the audio intensity value to the current property value.
- Multiply: Multiplies the base value by the audio intensity.
- Power: Applies a non-linear curve for more dramatic reactions, often used in complex light or other effects.
Parameters
Fine-tune how audio affects the property:
- Intensity: Controls the strength of the audio reactivity (default: 1). Higher values increase the effect amplitude.
- Blend Amount: Smoothly blends between the base property value and the audio-driven value (range: 0–1). At 0.5, the audio and manual values are mixed equally.
- Invert: Flips the audio reaction — higher frequencies reduce the value instead of increasing it.
Best Practices
- Start with low intensity and adjust upward as needed.
- Use Blend Amount to retain manual control while introducing subtle reactivity.
- Combine with Keyframes for hybrid animation: keyframe the base state, then add audio reactivity for dynamic variations.